Introduction to Sourcery
About this Tutorial
Welcome!
If you are new to Sourcery, you are in the right place - this tutorial is aimed at people just starting out.
If you're familiar with Sourcery already, you may instead want to browse the Reference material, the Guides, or the Further Reading.
In this tutorial, you'll learn:
- What Sourcery does, and how to use it as your pair programmer
- How to install Sourcery in VSCode & JetBrains IDEs
- How to use Sourcery interactively in VS Code & JetBrains IDEs
Non-VSCode/JetBrains users
If you are following this tutorial for the first time, we encourage you to install VSCode and follow along, even if you don't usually use VSCode for programming. This will help you understand what Sourcery can do, so you can make best use of it in your main programming workflow.
Tutorial Setup
Objectives
In this section, you will:
- Learn how to install Sourcery in your IDE
- Get the tutorial project
See Also
Requirements
- Windows, macOS, or Linux operating system (special instructions for M1 machines can be found here)
- VSCode installed (download at the official website) or a JetBrains IDE installed
gitinstalled (installation instructions on the official website)
Installing Sourcery
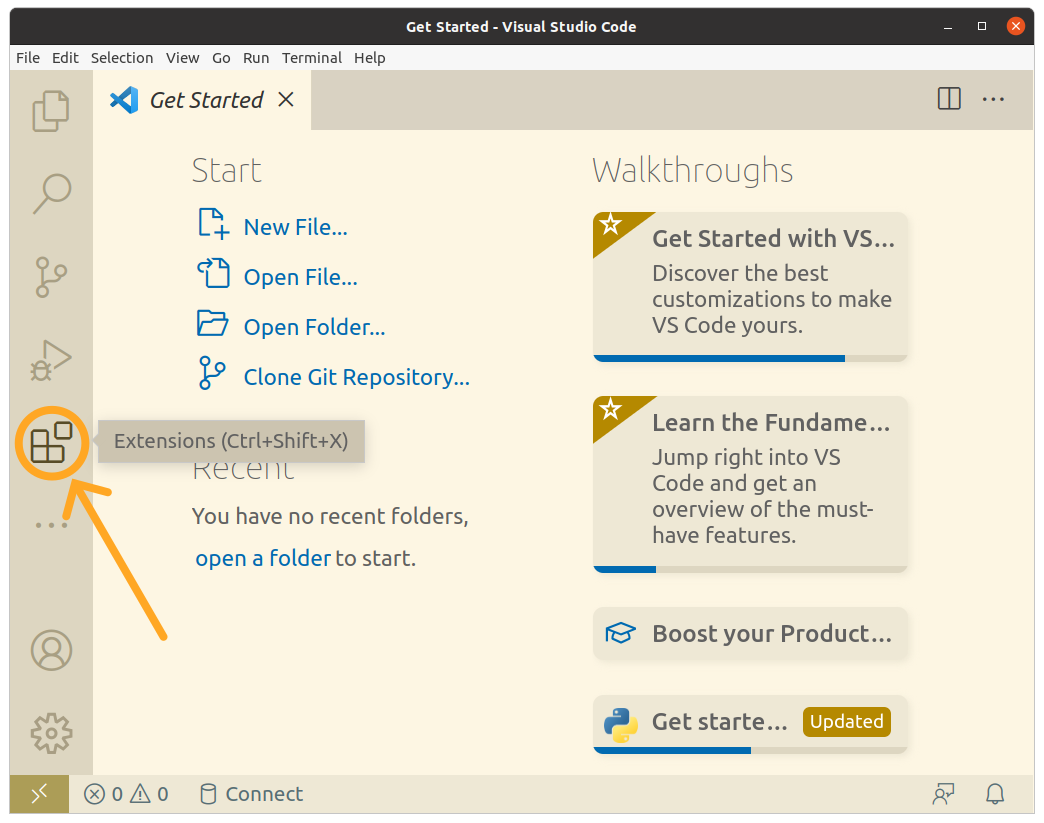
- Open VSCode, and click the icon in the sidebar for "Extensions"
or
Open a JetBrains IDE, go to "Settings", and select "Plugins"
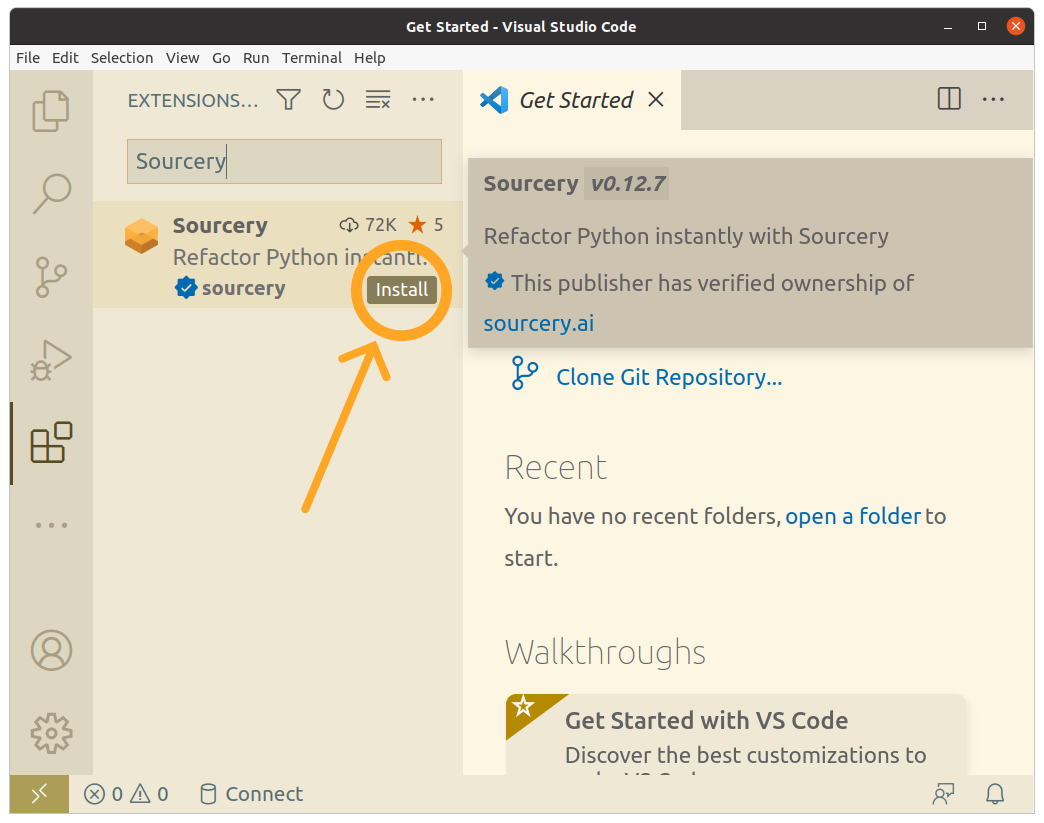
2. Search for "Sourcery" (note the "u" in the spelling) and click "Install" to install the extension
Logging Into Sourcery
Once you've installed Sourcery you'll need to log in to start using it. Click into the Sourcery section of the sidebar (click on our hexagon logo) and you'll see a prompt to log in.
Click the log in button and you'll be taken to our website to connect to your account. If you don't have an account you can easily create one and you'll get a 14 day free trial of Sourcery.
Once you log in you can go back to your IDE where you'll be prompted to opt in to use the sections of Sourcery that rely on third party large language models (Sourcery Chat, Recipes, and Code Review). You can still use Sourcery fully locally for our Rules and In-Line Suggestions without opting in here.
Once you opt in you'll be able to fully use Sourcery.
Demo Code
For the rest of this tutorial we'll be taking a look at this demo code:
def read_file(filename):
    with open(filename, 'r') as file:
        content = file.readlines()
    return content


def is_digit(character):
    return character in '0123456789'


def is_alpha(character):
    return 'a' <= character <= 'z' or 'A' <= character <= 'Z'


def is_valid_email_character(character):
    return is_alpha(character) or is_digit(character) or character in ['.', '-', '_']


def find_emails(line):
    emails = []
    i = 0
    while i < len(line):
        if is_valid_email_character(line[i]):
            start = i
            while i < len(line) and line[i] != '@':
                i += 1
            if i < len(line) and line[i] == '@':
                i += 1
                while i < len(line) and line[i] != '.':
                    i += 1
                if i < len(line) and line[i] == '.':
                    end = i
                    while i < len(line) and is_valid_email_character(line[i]):
                        i += 1
                    emails.append(line[start:i])
        i += 1
    return emails


def find_phone_numbers(line):
    phone_numbers = []
    i = 0
    while i < len(line):
        if is_digit(line[i]):
            start = i
            count_digits = 0
            while i < len(line) and (is_digit(line[i]) or line[i] in ['-', ' ', '(', ')']):
                if is_digit(line[i]):
                    count_digits += 1
                i += 1
            if count_digits == 10:
                phone_numbers.append(line[start:i])
        i += 1
    return phone_numbers


def extract_information_from_file(filename):
    lines = read_file(filename)
    all_emails = []
    all_phone_numbers = []
    for line in lines:
        emails = find_emails(line)
        phone_numbers = find_phone_numbers(line)
        all_emails.extend(emails)
        all_phone_numbers.extend(phone_numbers)
    return all_emails, all_phone_numbers


def write_to_file(filename, emails, phone_numbers):
    with open(filename, 'w') as file:
        file.write("Emails:\n")
        for email in emails:
            file.write(email + "\n")
        file.write("\nPhone Numbers:\n")
        for phone_number in phone_numbers:
            file.write(phone_number + "\n")


def main():
    input_filename = "sample.txt"
    output_filename = "output.txt"
    emails, phone_numbers = extract_information_from_file(input_filename)
    write_to_file(output_filename, emails, phone_numbers)


if __name__ == "__main__":
    main()
It's some sample code that reads from a file named sample.txt, extracts email addresses and phone numbers from it, and then writes the results to output.txt. The pattern matching is done manually, and there's definitely room for improvement
Interacting with Sourcery
Chatting with Sourcery
If you open the Sourcery sidebar you can start to ask Sourcery questions. When you select a section of code, Sourcery can then refererence that code in its answer.
Here we can select the sample code and ask it to replace the manual pattern matching with regex.
Sourcery will take a look at the code we've given it and suggest an updated version using regex.
If you hover over the code block in the chat window you will see 2 icons appear - the lefthand icon copies the code to your clipboard and the righthand icon inserts the codeblock at your current cursor location in your editor.
With the initial code still selected in your editor you can click the "insert at cursor" icon and replace the initial code.
Generating Docstrings and Tests
Above each function in the file you'll see a few commands - Generate Docstrings, Generate Tests, Ask Sourcery, etc. These are Code Lenses that you can use as quick commands to have Sourcery interact with your code.
Let's start by using one on the extract_information_from_file function. Click Generate Docstring above that function definition and Sourcery will propose a new docstring for that code.
You can add a line below the function definition, select the new line, and click the "insert at cursor" icon to add the docstring directly to the code.
Next you can have Sourcery write tests for the same function by clicking the "Generate Tests" code lens.
In the chat, you'll see a full test file that Sourcery proposes for that code. Click the copy icon in that code block and paste it into a new test file.
You should always review the tests that Sourcery writes and use them as a jumping off point for your tests rather than taking them as the optimal outcome (although we'll keep working to make them better and better!)
Explaining Code
So far we've used Sourcery to change existing code and write new code - but what if we want to learn more about the code we already have?
The Explain Code recipe tells Sourcery to give us an explanation about a section of code and is particularly useful when we we're working in a new project.
Click the Explain Code code lens above the extract_information_from_file function and Sourcery will give you more info about the function in the sidebar chat.
More Recipes
Sourcery has two more built in recipes - Optimize Performance and Simplify Code.
Let's try seeing how sourcery can further simplify extract_information_from_file.
Click on the Ask Sourcery code lens above the function and select Simplify Code from the dropdown that appears.
In the sidebar, Sourcery will suggest a simplified version of the code and explain what simplifications it's making. If it looks good to you, replace the current code with the simplified code. If it doesn't, you can ask Sourcery to make changes in the chat.
You can also use any recipe by selecting a section of code, opening the Sourcery sidebar, and clicking the button for the recipe you want to apply.

Sourcery's Rules Based Suggestions
Sourcery will passively review your code while you work and give you suggestions about how it could be improved based on language-specific rules and best practices. You'll know you have a Sourcery suggestion when you see a squigly underline on your code, such as this one:

Blue lines correspond to Suggestions and Comments, and yellow lines are used for Refactorings.
If you hover over these lines with your cursor, you'll see a pop-up window with some additional detail about the rule.
Important
Sourcery only underlines the first line of the code it thinks should change, to avoid visual spam.
Seeing Rules in The Problems Panel
As well as being shown as a wiggly underline in your code, Sourcery's matched Rules can be found in your IDE's "Problems" panel.
To open the problems panel, click "View" in the main toolbar and then select "Problems":
The problems panel shows a summary of all the Rules that Sourcery has matched in your open documents.
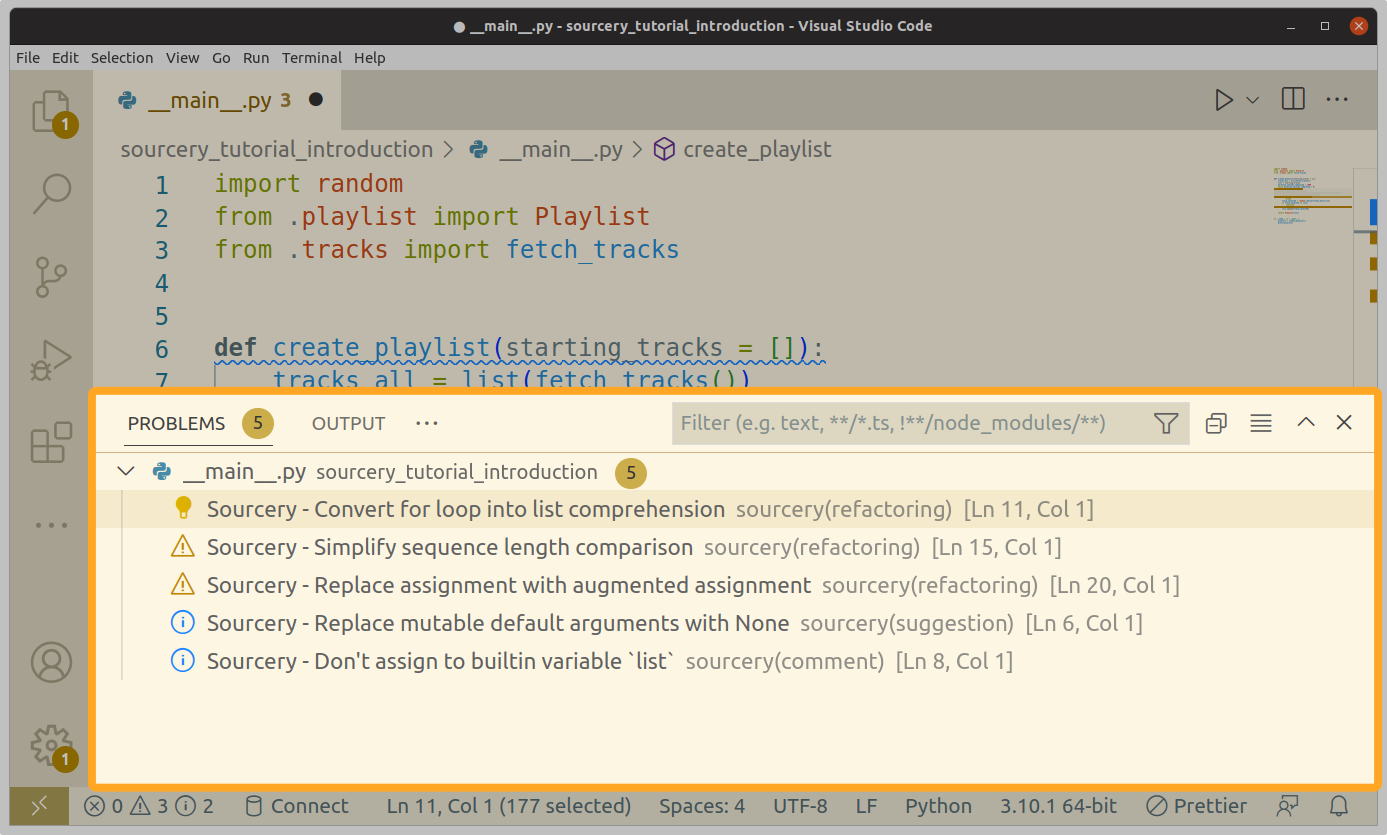
You can click on any of these to jump to their location in the document; this is convenient if you have large files and don't want to scroll through looking for refactorings.
How to Read Rule Details
Using your cursor, hover over the line in the editor which reads
emails = re.findall(pattern,line)
You should see a pop-up with a proposed change to your code.
Here's a bit of detail about what that pop-up means.
A summary line gives you an overview of the change. It may describe the change as "refactored", "making a change", or "identifying an issue" depending on the type of change. It will also try to tell you which function or lines of code will change.
The bullet point list shows a breakdown of each of the individual rules Sourcery has matched to make the change.
In this case, only one rule was used, in-line-immediately-returned-variable.
Towards the bottom you'll see a diff of the complete code change sourcery is proposing - it will delete four lines (shown in red) and introduce a new one (shown in green). A couple of unchanged lines are shown in gray for context.
The final lines show all the diagnostics your IDE has identified for this line, including a repeat of the main issue reported by Sourcery. If you have other plugins, there may be more here.
Skipping Sourcery's Rules
Sourcery's rules are opinionated, and you may disagree with them.
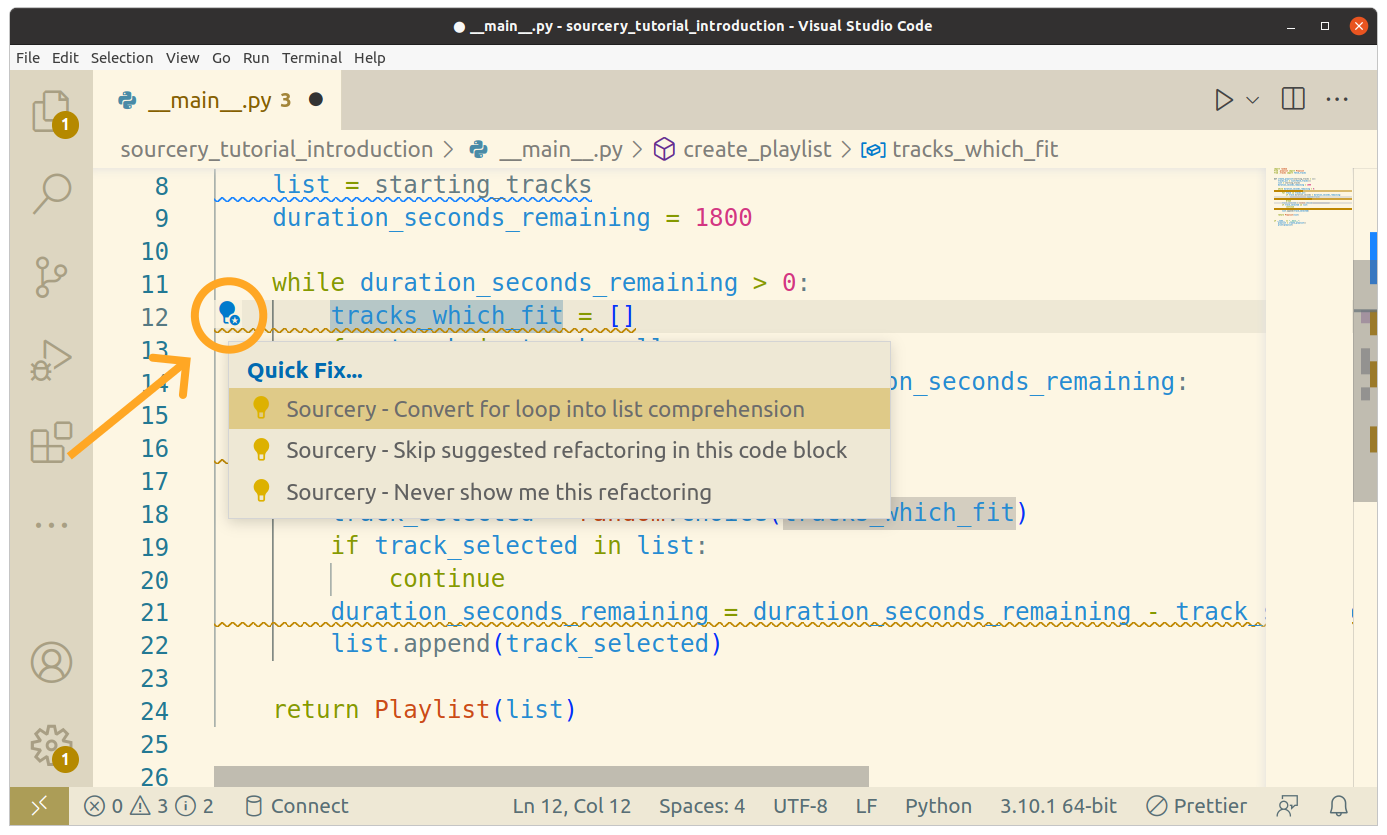
Skip a Rule Violation Once
If you don't think a rule is right for your code, you can "skip" it. Sourcery will add a comment to your code that lets it know not to search for that rule in the current function.
Hover over the second underlined line. Click on the lightbulb next to it to bring up a menu. The second menu item says "Sourcery - skip suggested refactoring in this code block". Choose this option.
Two things will happen. First, Sourcery will insert a comment near the start of the function which says
# sourcery skip: in-line-immdiately-returned-variable
Second, the highlighted Refactoring will disappear.
You can make Sourcery search for the in-line-immediately-returned-variable Refactoring again at any time by removing the
Python comment.
Running a Code Review
Once we've made a number of changes we can ask Sourcery to review our code - just like you might ask a colleague for a review of a pull request/merge request.
Open the Sourcery sidebar and click on the Reviews tab at the top. (Note: Code Review is currently in a closed beta - if you do not see a Reviews tab and would like to try it out, please email tim@sourcery.ai)
Here you can select what code you would like Sourcery to review - the HEAD of your current branch with your repos default branch or your uncommitted code with the HEAD of your current branch.
For now, select Compare uncommitted changes with HEAD and click Review My Code
Sourcery will then start a code reivew - it will start with a summary of your PR and then give you feedback, starting with general feedback and then moving to line specific feedback.
This review functionality is still under development, so please let us know what feedback you have.
Conclusions
Here you've seen how you can use Sourcery to create, change, and review code throughout your project. You can chat with Sourcery to clarify or expand any of Sourcery's responses if you find that the initial results of a recipe aren't what you needed.